Easy & Secure Methods To Troubleshoot QuickBooks Error h101

QuickBooks is the most popular and widely used option regarding accounting and bookkeeping software. A vital component of this program is its ability to support concurrent user access to the exact copy of QuickBooks and corporate files across a local network. However, because of the availability of this feature, many erroneous bugs can be introduced into your system.
Errors like H101, H202, H303, and H505 in QuickBooks Desktop might result from seemingly insignificant changes to the settings. In this blog, we'll take a closer look at QuickBooks Error H101, which appears when transitioning from single-user to multi-user mode. Let's start figuring out how to fix the H101 error in QuickBooks.
Major Causes That Trigger QuickBooks error h101
When users try to access the company file from a different device, they may see the QuickBooks error H101. Incorrect QuickBooks configuration or hosting settings are likely causes of this problem. In a shared setting, this error code stops the user from accessing the corporate file and must be fixed promptly. Some of the causes of the H101 problem in QuickBooks Desktop are listed below:
Either QuickBooks did not successfully retrieve your IP address, or the IP address it did retrieve was invalid.
Sometimes, H101 occurs because QuickBooks host settings are incorrect.
QB cannot launch because the Windows Firewall is misconfigured.
Either the specified path to the company data file does not exist or is wrong.
Due to an issue with the Network Data file, the company file cannot be accessed on a separate network.
QuickBooks services, including QBDBMgrN and QBCFMonitorService, are inactive.
Fixing QuickBooks error h101
Next, we'll look at successful methods for fixing the QuickBooks Desktop Error H101.
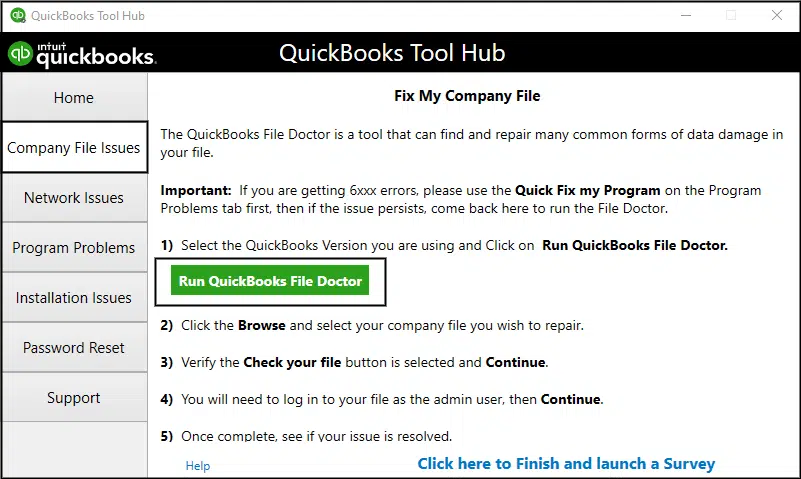
Method 1: Use QuickBooks File Doctor Tool
First, launch QuickBooks's multi-user mode by activating the server manager for its database.
Through its QB Server Manager, a multi-hosting environment encourages employees to access company files from various devices.
Save the QuickBooks Tool Hub file you download from Intuit's website to your desktop so you can access it quickly and conveniently.
Double-click it to start the installation process, and then double-click the Tool Hub icon on your desktop to launch it.
To access the QuickBooks Database Server Manager, go to the Network tab, then pick the option.
To begin the scanning process, navigate to your company file and press the Start Scan button.
If your QuickBooks Company file doesn't automatically open, choose it from your computer's file system before clicking the Start Scan button.
Just close the window and re-launch QuickBooks Desktop.
Select File > Switch to Multi-User Mode to activate multi-user hosting from the menu bar.
Method 2: Make a New Folder for Company Files on Your Computer's Desktop
If you move your company file, QB will use the new path to access the file, resolving the problem of using a broken or wrong approach.
To create a new folder on your desktop, right-click the desktop and select "New Folder" if QuickBooks is open.
Create a folder called "Test" by clicking the Windows icon and entering "Windows Explorer" in the search bar.
Select Windows Explorer from the list of apps, and then in the new window, go to where you keep your QuickBooks data.
In the next step, you'll need to click the Windows logo and type Windows Explorer into the search bar.
To make a copy of your company file, right-click on it and choose the. QBW option.
To paste the copied company file into the Test folder, right-click on it and select Paste from the context menu.
To access the company file from the new location, go to the File menu and select Open or Restore Company.
To access the file you copied and pasted into the Test folder, select it from the drop-down menu and click Open.
Method 3: Authorise QuickBooks by Removing it from the Windows Firewall Defender List
When the Windows firewall blocks QuickBooks, it can cause the program to malfunction. Removing firewall restrictions on QuickBooks is the solution to the H101 problem.
To open the Control Panel, press the Windows key plus the letter R, which will bring up the Run dialogue box.
System and Security > Windows Defender Firewall > Allow an app past the firewall.

To prevent QuickBooks from being blocked by the firewall, choose it from the menu of available programs and click OK.
Just rerun QuickBooks and see if you can carry out the necessary steps without any problems this time.
Similarly, if you're having trouble with QuickBooks' payroll, here's how to get it up and to run again
Method 4: Turn on Multi-User Hosting for the Server but not the Client's Computer
If multi-user access is enabled on your workstations, QB may report error code H101. You must follow the instructions below to fix this, as this option can only be activated on the server or hosting machine.
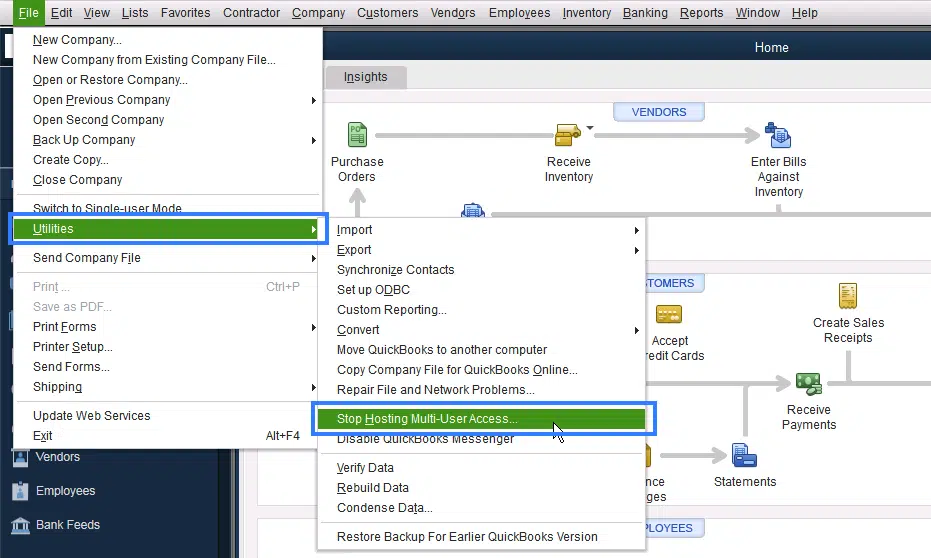
Launch QuickBooks but avoid the company file by clicking the File tab.
To turn off hosting, use the "Stop Hosting Multi-User Access" option if it shows in the menu.
Check the hosting configuration on your Server machine and repeat the above steps on any other affected workstations.
On the shared computer, launch QuickBooks Desktop by clicking the File menu and selecting Utilities.
To activate your server's multi-user mode, navigate to the Host Multi-User Access menu and click it.
Relaunch QuickBooks and see if the multi-user H101 error has vanished.
Final Words
QuickBooks Error H101 can occur for various reasons, each of which has a corresponding fix. However, if you follow the instructions above, you will be well on solving your error.
But, If You face any father issues you can contact us at +1800-615-2347. Our QuickBooks support team will assist you.


Comments
Post a Comment